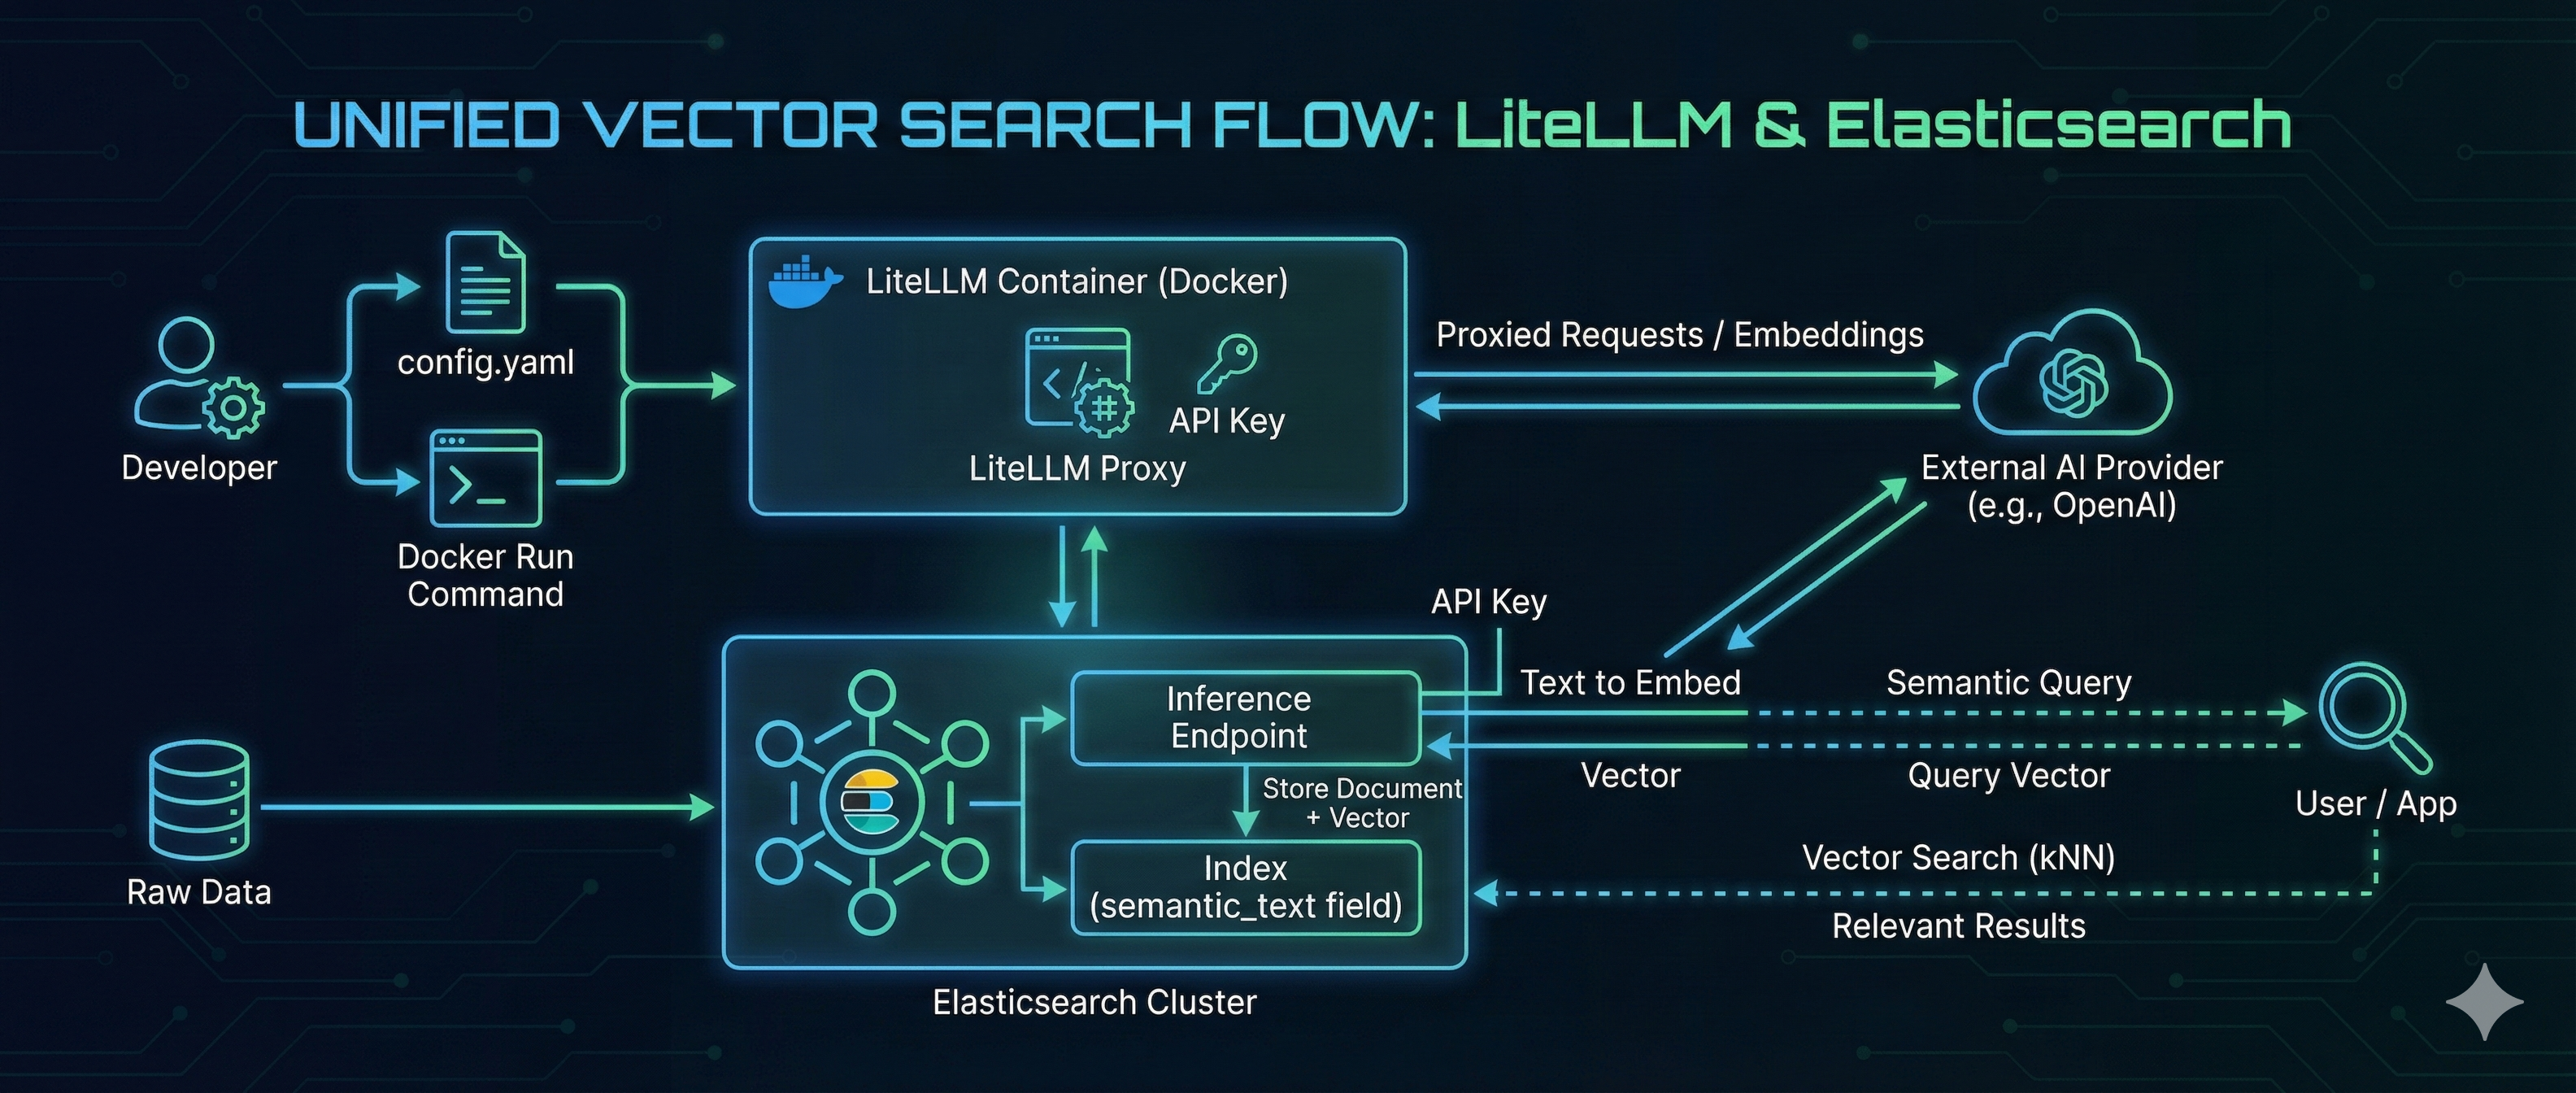
In the rapidly evolving landscape of AI, managing the “plumbing” between your embedding models and your search engine is often a challenge. Developers frequently struggle with switching providers, managing API keys, and maintaining consistent API specifications.
LiteLLM solves the model management problem by acting as a universal proxy, while Elasticsearch delivers high-performance Vector Search. By combining them, you can build a search architecture that is both flexible and powerful.
In this guide, we will walk through hosting an OpenAI-compatible embedding model using LiteLLM on Docker and consuming it directly from Elasticsearch to perform seamless vector search.
Prerequisites
- OS: Ubuntu 24.04.3 LTS (or similar Linux environment)
- Docker: Ensure Docker is installed and running.
- Elasticsearch: An Elastic Cloud instance or a self-managed cluster.
Step 1: Configure and Run LiteLLM
First, we need to configure LiteLLM. This tool will act as our gateway, proxying requests to various models (like GPT-4 or specific embedding models) while presenting a unified OpenAI-compatible API to the outside world.
1. Create the config.yaml file:
model_list:
  - model_name: gpt-4o
    litellm_params:
      model: openai/gpt-4o
      api_key: os.environ/OPENAI_API_KEY

  - model_name: gpt-3.5-turbo
    litellm_params:
      model: openai/gpt-3.5-turbo
      api_key: os.environ/OPENAI_API_KEY

  - model_name: text-embedding-3-small
    litellm_params:
      model: openai/text-embedding-3-small
      api_key: os.environ/OPENAI_API_KEY
2. Run LiteLLM with Docker:
We will run the container with the config mounted. We also define a LITELLM_MASTER_KEY (sk-my-admin-key-123), which will serve as the static API key for our internal services to authenticate against this proxy.
docker run -d \
  -p 4000:4000 \
  -v $(pwd)/config.yaml:/app/config.yaml \
  -e OPENAI_API_KEY="enter your openai api key" \
  -e LITELLM_MASTER_KEY="sk-my-admin-key-123" \
  docker.litellm.ai/berriai/litellm:main-latest \
  --config /app/config.yaml --detailed_debug
Step 2: Verify the Proxy
let’s ensure our LiteLLM proxy is correctly handling requests.
Test Chat Completion:
curl http://0.0.0.0:4000/v1/chat/completions \
  -H "Content-Type: application/json" \
  -H "Authorization: Bearer sk-my-admin-key-123" \
  -d '{
    "model": "gpt-4o",
    "messages": [
      { "role": "user", "content": "Hello from LiteLLM Docker!" }
    ]
  }'
Test Embedding Generation:
curl http://0.0.0.0:4000/v1/embeddings \
  -H "Content-Type: application/json" \
  -H "Authorization: Bearer sk-my-admin-key-123" \
  -d '{
    "model": "text-embedding-3-small",
    "input": "LiteLLM makes proxying easy."
  }'
Step 3: Configure Elasticsearch Inference
Now we connect the two pieces. Let’s create elatic deployment instance from Elastic cloud.
Since LiteLLM provides an OpenAI-compatible interface, we can use the standard OpenAI inference in Elasticsearch but point it to our custom LiteLLM URL.
For more details on configuring these connectors, refer to the API doc
Create the Inference Endpoint
Run the following in your Kibana Dev Tools. Note that the url points to our LiteLLM endpoint and the api_key matches our LiteLLM master key.
PUT _inference/text_embedding/litellm-embeddings
{
   "service": "openai",
   "service_settings": {
       "api_key": "sk-my-admin-key-123",
       "model_id": "text-embedding-3-small",
       "url": "http://litellm_endpoint:4000/v1/embeddings",
       "dimensions": 128
   }
}
Output
{
  "inference_id": "litellm-embeddings",
  "task_type": "text_embedding",
  "service": "openai",
  "service_settings": {
    "model_id": "text-embedding-3-small",
    "url": "http://litellm_endpoint:4000/v1/embeddings",
    "similarity": "dot_product",
    "dimensions": 128,
    "rate_limit": {
      "requests_per_minute": 3000
    }
  },
  "chunking_settings": {
    "strategy": "sentence",
    "max_chunk_size": 250,
    "sentence_overlap": 1
  }
}
Test the Inference Endpoint
Let’s verify that Elasticsearch can generate embeddings via LiteLLM:
POST _inference/text_embedding/litellm-embeddings
{
 "input": "The sky above the port was the color of television tuned to a dead channel."
}
Output:
{
  "text_embedding": [
    {
      "embedding": [
        -0.02372423,
        -0.016345346,
        -0.269933,
        -0.038996283,
        0.06547082,
        -0.04299877,
        0.059388835,
        -0.13049445,
        -0.019900626,
        0.09131928,
        0.024954043,
        0.08608698,
        -0.072268344,
        0.09623853,
        0.06260871,
        0.0264969,
        0.21161744,
        0.00086855615,
        -0.2389864,
        -0.07410188,
        -0.00018866465,
        -0.0704348,
        -0.08724971,
        0.14078017,
        -0.121192575,
        0.011660873,
        0.07177641,
        0.070211194,
        -0.01770932,
        0.13067332,
        0.02551305,
        -0.16734414,
        0.0144000035,
        -0.033562742,
        0.12226587,
        -0.097311825,
        0.08868077,
        -0.011236028,
        -0.08631058,
        -0.13541369,
        0.007585716,
        -0.08742859,
        0.19337147,
        0.072447225,
        -0.025155285,
        -0.07025592,
        -0.0071552815,
        0.03591057,
        0.118509345,
        0.028598765,
        -0.094628595,
        0.051115543,
        -0.03497144,
        0.053888213,
        0.046196286,
        -0.091945365,
        -0.013449693,
        -0.025759013,
        0.13764973,
        0.046554048,
        0.08841244,
        0.05460374,
        -0.025826093,
        0.030611187,
        -0.012197519,
        -0.1722634,
        -0.02372423,
        -0.0021340067,
        -0.025222367,
        0.06158014,
        0.09740127,
        -0.010352798,
        -0.05701865,
        -0.06381617,
        -0.0127341645,
        0.042149078,
        0.034144107,
        -0.012432301,
        0.1711901,
        -0.13112053,
        -0.0789317,
        0.12879506,
        -0.14677271,
        -0.02915777,
        -0.0157528,
        0.007390064,
        -0.04659877,
        -0.10473543,
        0.04152299,
        0.16662861,
        0.017060874,
        0.12333916,
        -0.06256399,
        -0.09167704,
        -0.023120502,
        0.03872796,
        -0.17852427,
        -0.020314291,
        0.023232304,
        -0.050578896,
        0.05983604,
        0.020470813,
        -0.14417891,
        -0.0002360055,
        -0.0051400634,
        0.07334163,
        0.12655903,
        0.0008245344,
        -0.057644736,
        -0.067080766,
        -0.02989566,
        -0.04223852,
        -0.14838265,
        0.1329988,
        0.009531058,
        0.038638517,
        0.08076524,
        -0.0014939444,
        0.24846715,
        -0.012711804,
        -0.003342858,
        0.014411184,
        -0.077232316,
        0.033629823,
        0.082598776,
        -0.020850938,
        0.08376151,
        0.12772177
      ]
    }
  ]
}
Step 4: End-to-End Vector Search
Now that the pipeline is ready, we can perform Semantic Search. We will use the (semantic_text)[https://www.elastic.co/docs/reference/elasticsearch/mapping-reference/semantic-text] field type, which abstracts the embedding generation process—Elasticsearch calls LiteLLM automatically during data ingestion and query time.
1. Create the Index
PUT /litellm-test-index
{
 "mappings": {
   "properties": {
     "content": {
       "type": "semantic_text",
       "inference_id": "litellm-embeddings"
     },
     "category": {
       "type": "keyword"
     }
   }
 }
}
2. Ingest Data
POST /litellm-test-index/_bulk
{ "index": {} }
{ "content": "The quick brown fox jumps over the lazy dog.", "category": "animals" }
{ "index": {} }
{ "content": "Artificial intelligence is transforming software development.", "category": "tech" }
{ "index": {} }
{ "content": "Docker containers make deployment consistent and easy.", "category": "tech" }
3. Verify Data
You can now search the index.
GET litellm-test-index/_search
Note: You will not see the embedding vectors in the _source output. This is by design to save storage space. To learn more about this behavior, check out the Elastic Search Labs blog on excluding vectors from source.
4. Perform Semantic Query
Finally, let’s run a natural language search. The query “tools for deploying software” does not exist in our text, but the vector search identifies the semantic relationship with “Docker containers.”
GET /litellm-test-index/_search
{
 "query": {
   "semantic": {
     "field": "content",
     "query": "tools for deploying software"
   }
 }
}
Output
{
  "took": 501,
  "timed_out": false,
  "_shards": {
    "total": 10,
    "successful": 10,
    "skipped": 0,
    "failed": 0
  },
  "hits": {
    "total": {
      "value": 3,
      "relation": "eq"
    },
    "max_score": 0.7422092,
    "hits": [
      {
        "_index": "litellm-test-index",
        "_id": "UZR4pJsBGjew_vztklFP",
        "_score": 0.7422092,
        "_source": {
          "content": "Docker containers make deployment consistent and easy.",
          "category": "tech"
        }
      },
      {
        "_index": "litellm-test-index",
        "_id": "UJR4pJsBGjew_vztklFP",
        "_score": 0.68897665,
        "_source": {
          "content": "Artificial intelligence is transforming software development.",
          "category": "tech"
        }
      },
      {
        "_index": "litellm-test-index",
        "_id": "T5R4pJsBGjew_vztklFP",
        "_score": 0.5035514,
        "_source": {
          "content": "The quick brown fox jumps over the lazy dog.",
          "category": "animals"
        }
      }
    ]
  }
}
Conclusion
This architecture demonstrates the power of decoupling your model provider from your search engine. By using LiteLLM as a standardized proxy, you gain the flexibility to swap underlying models without breaking your application. Simultaneously, Elasticsearch’s Vector Search leverages these embeddings to provide deep semantic understanding.
Together, LiteLLM and Elasticsearch create a robust, future-proof foundation for building intelligent search applications that go far beyond simple keyword matching.
Happy searching!